

Wednesday 25 December 2013
Wednesday 18 December 2013
Fabulous Finds!

I never used to be an Op- shopper, but something changed. Maybe it was finding a bargain. You kinda get that 'rush' ( I suppose like gambling!) once you've discovered that awesome find and you just want to do it all over again!!
The above was my 'score' for the day. And it came to the grand total of $4.50!!! Sure I didn't need them- but I can't resist a bargain!!! And I will use them one day.... I'll keep you updated!
Saturday 30 November 2013
I'm a market girl, in a market world!!
Hello Blog and Blog Friends!!
It is such a crazy time of year isn't it??!! I've been so busy sewing owls and doing markets, that I have had to take a little rest from blogging. I'm not promising anything, but I'm going to try and be here a little bit more now.
I have actually been around though, lurking behind my screen, just quietly reading other blogs, getting inspired and looking at such wonderful and amazing things that are being made and created around the world!
I've got so many projects just waiting to be completed (actually starting them first would help) and then I will happily share with you all.
In the mean time, I thought I'd share a few market pics.
See you soon!


Tuesday 17 September 2013
My Five Minutes of Fame


Yes it's true!! I am basking in the glory of my five minutes of fame! As you can see above, this is the flyer used to promote this weekends Family Fest at The Glades Byford. And yes, those are MY owls!! I'm just a tad bit exited. If you follow me on either Facebook or Instagram you may have already heard how thrilled I am! Better be careful though.... I might get a swelled head!!
Wednesday 11 September 2013
The (not-so-healthy) Chicken Cheese and Bacon Roll

"Prepare to battle!!!!!........" well almost... that's how it seems most nights in my house at dinner times. I know I've said it before but I have a fussy family. Miss 18m is not too bad.... Mr 5 and 8 and hubby are pretty bad.
So... we tend to have the same things all the time. I get bored. I get bored preparing, bored cooking and bored eating the same things all the time. Me - I don't think I'm fussy. There isn't much that I wont eat, or at least try.
So the other night I had a success. I made a (not-so-healthy) Chicken, Cheese and Bacon Roll in puff pastry. Everybody ate it and no complaints! WINNER!!!
I got the inspiration from the blog The Organised Housewife. She made a very healthy Spinach and Chicken Roll. I knew my lot wouldn't have a bar of spinach so I used the ingredients I knew they would like.
And just to add a bit of healthiness into it, I added some pureed cauliflower to the chicken mince (cheeky, cheeky I know, but I've got to get those veg into them somehow!!) So I'll share my recipe with you, and for the healthier alternative, check out The Organised Housewife!
Preparation Time : prepare at least 1 hr before cooking
allow up to 1 hr for cooking
Ingredients:
2 pieces of breast chicken, minced (mine included hidden cauliflower)
1 sheet of puff pastry
1/2 tub cream cheese
1 cup grated cheese
4 rashes of bacon
Here's what I did:
- spread an even layer of chicken mince over the puff pastry

- Slightly melt the cream cheese in the microwave for a few seconds, just to soften it.
- Then spread the cream cheese over the chicken and sprinkle with grated cheese
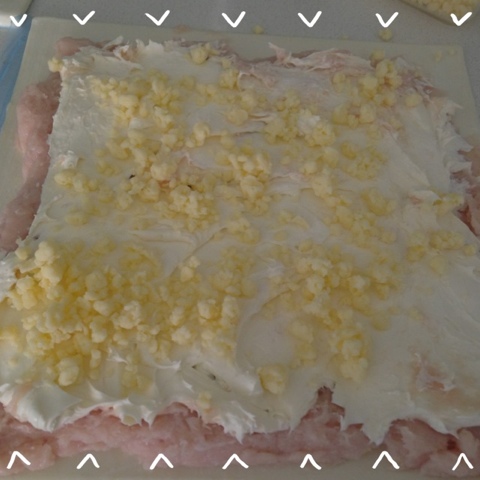
- Lay your rashes of bacon on top of the cheese

- Carefully roll the entire thing up into a tight log. Use a touch of water to seal the pastry at the base if needed

- Then rap your "log" tightly in some glad wrap, and leave in the fridge for about 1 hour to allow the cream cheese to re-set.

- Bake on 180 deg for at least 40 mins, or until pastry is golden. ( mine took a little longer, adjust time to ensure chicken is cooked through)

Definitely a winner in my house!!!
Do you have a fussy family? Whats their favourite dinner?
Friday 6 September 2013
Weekend Project - Bunting

I think using bunting to celebrate special occasions is a great tradition to start! I'm going to make each of the kids their own special ones for their birthdays, as well as a Christmas one...maybe Valentines, Easter, Halloween.... oh the possibilities are endless!!!!
Making bunting is something that I find really therapeutic. Maybe it's because of the repetition? Not sure really, but it's something that I enjoy, so I thought I would share it as a Weekend Project for you to try too.
So firstly - gather your fabric supplies. Either co-ordinated or random, or make it all from the same piece, it's up to you. You'll also need some Bias Binding Tape or ribbon or something to string it all together, Plus a sewing machine and your usual sewing supplies.

Then, I like to make a stencil. This makes it easier to keep all the pieces the same size. Empty cereal boxes come in really handy for stencil making! My stencil is about 18cm across the top, and measures about 23cm from the top to the point.

You then need to fold your fabric in half, with the pattern facing in, and pin together. Then either trace around the stencil or pin it on and cut out. Do this until you have your desired amount of 'flags' in each of your chosen fabric.

Stitch around each set of flags leaving minimal seam around the edge. I leave the top of the flag unstitched as this will be sewn later. Then cut any extra fabric off, so the stitching is as close to the edge as possible.

Turn the flags in the right way ensuring you have a good point at the end. I like to use a knitting needle to poke it all out.

Then iron your flags flat and order them how you would like them hung.

I use Bias Binding Tape along the top of my bunting. I fold it in half and iron it flat. Then I slip the top of each of the flags into the fold and pin down. You could easily run a length of ribbon across the top if you didn't have the Bias Tape.


Then sew it all together!

And there you have it! A funky new bunting to hang around the house or to use for a special occasion!


Why not try one for yourself this weekend! - or if you would prefer head over to my Etsy Store where I have some for sale!!
Monday 2 September 2013
Bloglovin
So I've just joined Bloglovin..... not really sure what it's all about, but Im willing to give it a go! So If your part of Bloglovin why not follow me, and I'll follow you- ( and let me know what it's all about!)
Friday 30 August 2013
Weekend Project - Mouse Pad Making!

Whilst sitting at my computer, mouse in hand, trying to think of my next project, my eyes gazed down to my tatty old rubber mouse pad. Perfect.
Ive been looking for a quick and simple project to use up my scrap fabric. A mouse pad will be perfect.
Here's what I did:
Materials:
scrap fabric
Piece of felt
Pins
Iron
Sewing machine
Step 1: Gather the scraps you wish to use. These can be either co-ordinating, random or just a single piece.

Step 2: Cut your piece of felt to the desired size and shape of your mouse pad- who says they have to be squares? Why not try a heart or flower shape?
Step 3: Pin the scraps together (patterns facing inside) and sew leaving minimal seem.

Step 4: Unfold and iron piece flat.
Step 5: Lay the right side down on felt. Sew around the edges leaving a gap of about 3cm.
Step 6: Cut excess fabric off.
Step 7: Turn in the right way and iron flat again.
Step 8: Zig zag stitch around the outside of your mat, making sure to fold in the open edge.

Step 8 Ta Da!!!! Your very own hand made mouse pad!!!
Completely easy and would make a cool gift for Father's Day, Mother's Day, or a gift around the office!!
Why not make one this weekend!

Tuesday 27 August 2013
In the Kitchen: Mocha Slice

I'm back from my little blogging holiday, and I'm now busting with heaps of inspiration and loads of ideas for new little weekend projects! There's going to be some exciting times ahead!!
So I thought my first post back would be something yummy to celebrate! And as I cant give you an actual piece of my Mocha slice, (mainly because I have already eaten most of it...) I thought I would share the recipe with you. It's a totally yummy little cakey slice that has been a family favourite for a while now.
I'm not sure where the recipe came from originally, but it has evolved over the years, and I must say, I think this was the best it has ever turned out! So here's the recipe if you'd like to try it for yourself.
Ingredients:
125g butter
1/2 cup milk chocolate melts
3-4 heaped teaspoons of instant coffee
1/2 cup sugar (I use a combination of caster sugar and brown sugar)
1 egg
1 tsp vanilla essence
3/4 cup plain flour
3/4 cup self raising flour
1/2 cup of chopped nuts ( I used almonds)
your choice of topping - ie icing sugar, icing etc
What to do:
- melt butter and chocolate together
- add vanilla, coffee and sugar and stir until combined
- add egg and nuts
- add flours and stir until well combined. If mixture is a little stiff add a splash of milk
- pour into baking dish and bake for around 20 mins on 180deg or until the mixture has cooked through.
- cool before decorating with either a sprinkling of icing sugar, coffee or chocolate icing, melted chocolate.......
And that's it! Yummo! Don't eat it all at once!
Friday 23 August 2013

Wednesday 24 July 2013
A Short Goodbye

Hi friends. I've decided to take a little blogging pause for a few months. I need to concentrate a little more on my House of Nicnax business as this is keeping me very busy! Hope you understand!
It will only be for a few months- but in the mean time if you miss me you can always pop by my Facebook page or Etsy page as I will still be updating these!
So bye for now and see you soon! Xxx
- Nicole
Friday 5 July 2013
Weekend Project- Chilli Garland

So a little while back I told you all how overrun with chillis we are in our house! Yes we have millions of chillis. I have been handing them out to family, friends, neighbours - anyone that will take them really!
I used a whole batch for some awesome Sweet Chilli Sauce, and now as the chilli seasom is finishing up, I thought I would make a Chilli Garland with the last lot from the trees - yes Trees, my plants are HUGE.
So this will be my first post in my new Weekend Projects series. Here's how I did it!

First I filled my bowl with an assortment of the chillis. Red- green - and orange, and all the shades inbetween.

Then I used some embroidery thread and needle to string them all together

I like to thread randomly. The colours are amazing. They are so autumn-y!

And finally I have strung it up in the garden. It looks great as it spins in the wind! I know technically a garland is usually draped, or a circular shape - but I'm still going to call this a Garland as that sounds better than "Hanging Thing"!!
**** BIG hint..... Don't touch your face whilst threading the chillies!!! And be sure to wash your hands well after!
Here's some others I made as well. These ones are with some herbs from the garden. These smell so devine!

So this weekend why not make your own garland? Maybe a herb or flower one?
Have Fun!
Tuesday 2 July 2013
Ticking Off the To-Do List

Ta Daaa!!! My daughters room is finished!!!! I can tick it off the to-do list! I've had the curtain fabric for over 2 yrs now (I bought it 6 months before she was born) and finally I have finished making the curtains! I'm pretty please with them so I thought I'd share a pic with you!


Overtaking the dining room...
Monday 24 June 2013
A Day At The Beach
What better thing to do on a cold but sunny day than visit the beach?
The kids just LOVE the beach so I thought I'd share some of our photos with you. This particular trip was extra special as it was our Miss Z's first real time. I dont think I'll write about our day, I think the photos can speak for themselves.


Subscribe to:
Posts (Atom)